How to Prevent Ice Dams on Metal Roofs

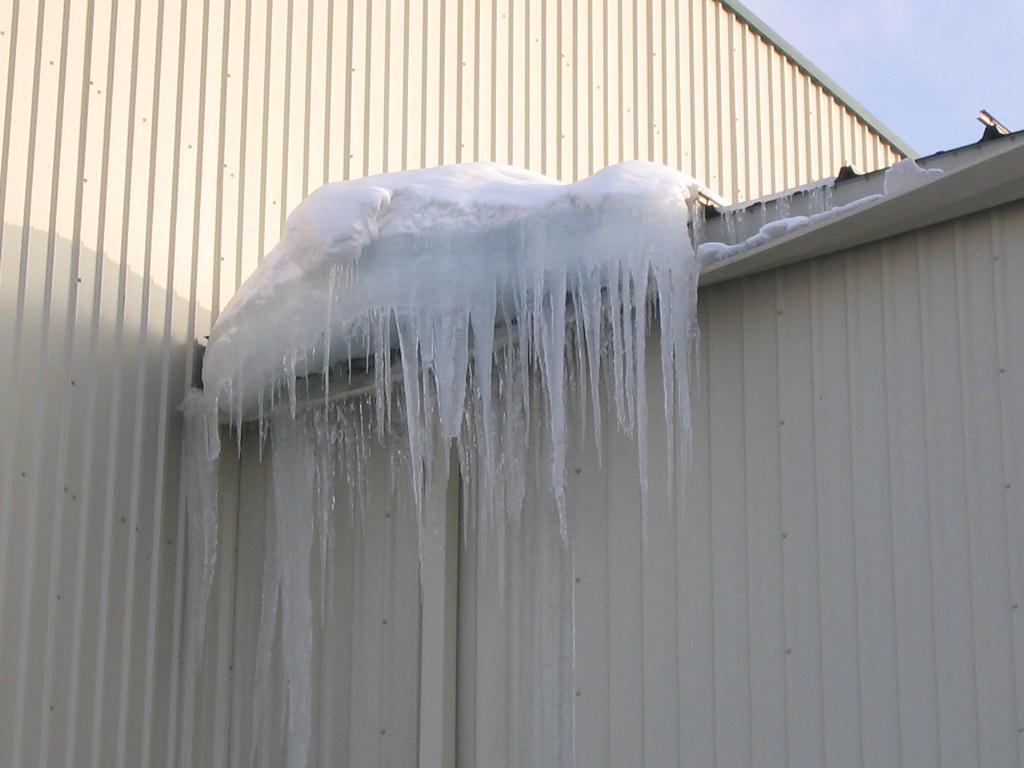
Those in areas prone to below-freezing temperatures are likely familiar with ice dams and the costly damage they can cause. With winter weather already upon us, it’s important to ensure your building is protected against the dangerous and expensive effects of ice dams.

What Causes Ice Dams to Develop?

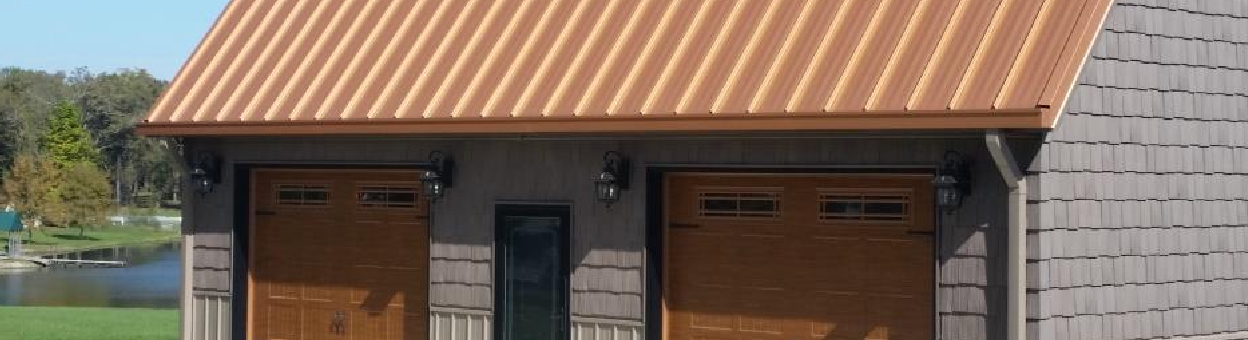
Most ice dams are a result of building air barrier flaws. When warm indoor air escapes through a rooftop, it warms the roof sheathing. This rise in temperature melts the underside of the layer of snow on top. The melted snow then moves down the slope of the roof toward the eaves, where it freezes into ice. As this process continues, the ice thickens, resulting in ice dams. These obstructions can cause water to back up and form a reservoir that can damage ceilings.

Ice Dams | ABC Blog

How Can Ice Dams Be Prevented?

To prevent ice dams, follow these four steps:

  1. Seal Air Leaks: Sealing air leaks between the warm building interior and the attic or ceiling is imperative to prevent increased sheathing temperatures that can lead to ice dams. If your roof leaks every winter, it’s likely that an air leak is to blame. And, getting a new roof is not likely to help—even if it features more ventilation. The simple way to determine if you have air leaks is to get into your attic and check. Leaks can likely be easily sealed with two-component polyurethane spray foam. And extending any exhaust fans that don’t reach outside can help adequately seal the structure.
  1. Ensure Proper Insulation: Many buildings don’t have adequate insulation levels to prevent ice damming. Building codes based on your geographic location can help you determine how much insulation you need. If the structure’s design doesn’t allow for adequate insulation, we recommend installing as much closed-cell spray polyurethane foam as possible. If replacing your roof, you can also install additional rigid foam insulation on top of the existing roof sheathing before you install the new roof. When taking that approach, make sure all products used are compatible with your new roof and adhere to manufacturer’s recommendations. It’s also imperative that attic insulation completely covers the top plates of a building’s exterior walls.
  1. Improve Ventilation: Improving ventilation alone will not prevent air leaks that cause ice damming and should never be your first or only defense. In fact, improving ventilation without sealing air leaks and installing adequate insulation can increase heating costs and make ice damming problems worse. Despite this, if combined with steps one and two above, addressing your roof ventilation can’t hurt. The best ventilation options include soffit and ridge vents. It’s important to remember that all attic ventilation systems require an insulation dam (blocking) between the trusses and ventilation baffles at the attic’s perimeter, facing the soffits, to maintain a ventilation channel from the soffit to the attic and protect against wind-wash.
  1. Use Underlayment: Covering your roof sheathing with two or more layers of rubberized membrane underlayment is another protection method that is far less effective if not used in concert with steps one and two. To use properly, it should extend from roof eaves to a point that’s three feet higher than your exterior wall.

Additional measures like framing your roof with raised-heel trusses can also help prevent ice dams. Additionally, avoiding including valleys as well as gutters that are at or above the roofing plane is ideal. Taking these steps can help ensure people and property are safe from overhead dangers. This should be a priority when designing, installing and maintaining your metal roof.

For additional information on how metal roofs perform in winter weather, read part one and part two of our ‘Metal Roofs and Snow’ blog series. For additional tips on how to winter-proof your roof, reach out to a local ABC representative today.

DISTRIBUTORS: Shop online at shop.abcmetalroofing.com!

Roofing and Snow: Everything You Need to Know – Part Two

Additional considerations for working with metal panels in winter.

In part one of our series on metal roofing and snow, we covered five of the most important elements to consider when preparing structures for winter weather. In this post, we’ll review four more ways to prevent unexpected, costly damage of metal panels in winter.

  1. Consider roof material and surface color

Metal roofs absorb heat quickly and radiate it effectively. Darker panel colors can enhance this solar absorption effect, which can save you money year-round. But because UV light can pass through 3-5 inches of snow, when combined with heat loss through the roof, it becomes more difficult for snow to stay solid. To minimize the chance of ice damming, you should ensure your roof system is properly sealed and insulated. If not, ice damming may occur and the melting and re-freezing of snow throughout the day can result in icy layers that promote snow sliding—no matter the roof material or color.

  1. Review weathertightness factors

For low-sloped roofs (less than 3:12), it is especially important for panel seams to be watertight to prevent water (melted snow) from leaking into the structure. This can be problematic when snow gathers and stays on a roof. Architects, designers and specifiers, therefore, should consider using panels that have passed the ASTM 2140 water head test or FM 4471 Appendix G water test. Water-resistant underlayment should also be considered for all roof slopes.

ABC Blog: Roofing and Snow: Everything You Need to Know about Metal Panels in Winter - Part Two
A close-up of this dormer roof illustrates how the impact of sliding ice and snow can damage panel seams.
  1. Consider your roof layout

Design elements like valleys and slope changes cause snow to collect and increases your snow load. Also, when dormers extend from a large roof area and one area is significantly bigger than the other, the structure is susceptible to experiencing unbalanced sliding snow. This imbalance can actually tear open standing seams and displace panels. Also consider that drifting snow may accumulate behind HVAC units, at perimeter walls, and behind solar and photovoltaic (PV) panels.

  1. Ensure Proper Roof Maintenance

One of the best ways to prevent snow and ice issues is to regularly inspect and maintain your roof. In addition to cleaning and inspecting your roof for possible issues, properly removing standing snow and preventing ice dams is a vital part of avoiding damage to your metal panels in winter. This often requires that you get into your attic to inspect for air leaks—the leading cause of ice dams. Read more about how to properly maintain and remove snow from your roof in this blog post.

If an issue is discovered, consult your roofing material manufacturer for recommendations as well as advice on warranty claims. Additionally, you can reach out to a trusted roofing professional in your area. These professionals can thoroughly inspect your roof system to help you determine ways to rectify any potential issues. You’ll want to do this before damage and/or injury occurs and before you pay for sub-par or ineffective repairs.

If you missed part one of this series, click here for our top five considerations. These include managing snow load and sliding snow, preventing ice dams, using retention systems and more! For more information on how metal panels fare in winter weather conditions and for advice on how to winter-proof your roof, reach out to an ABC representative today.

Roofing and Snow: Everything You Need to Know – Part One

What to consider when designing and building in snow-prone areas.

While properly-designed metal roofs historically perform well in winter, heavy snowfall can be detrimental to buildings of all kinds. Those who live and work in and around them are also at risk when snow and ice cause dangerous situations. Even though winter doesn’t formally begin until late December, colder weather is upon us. And while you might not be expecting snow or ice yet, keep these roofing and snow tips in mind when designing, constructing and maintaining structures in areas where there’s a chance for snow and/or ice over the course of the year.

Considerations for Snow-Bearing Roofs:

  1. Anticipate Snow Load

Snow accumulates on every roof type, and as this happens, it increases the amount of weight your structure is bearing. This increased weight (snow load) can pose several threats to the structure and those in and around it. For example, when the weight of snow or ponded water from melted snow exceeds the structure’s limits, the roof or even the entire structure can collapse. Be sure you’re aware of the weight your structure can bear and remove snow to keep it within its limits. Consult the International Building Code (IBC) as well as state and local codes for guidance based on your location.

  1. Prevent Ice Dams

Most ice dams are the result of air barrier flaws in buildings. If warm indoor air escapes through the roof floor, it warms the roof sheathing and melts the underside of the layer of snow on top. This water then moves down the slope of the roof toward the eaves, where it freezes into ice. As this process continues, the ice gets thicker and thicker, resulting in ice dams. The presence of these dams allow water to back up and form a reservoir that can cause major damage.

To prevent ice dams, you should:

  • Seal all air leaks at the attic floor
  • Ensure proper insulation
  • Provide adequate attic ventilation

Another tip is to use a peel and stick membrane on the roof deck extending from the eave to about 3’ up-slope from the exterior wall. For more specific details on the ice dam prevention tips above, read our recent blog post.

  1. Prevent Sliding Snow

Gravity can cause accumulated snow to slide down the roof’s slope (shedding), potentially injuring people and damaging property below. Despite this, snow shedding must occur to keep the snow load from accumulating beyond the buildings structural limits. Balancing snow load and shedding is important and requires that you consider geographical and building material and roof design factors.

ABC Roofing and Snow Blog
Ice and snow sliding down the main roof has damaged the roof panels and the valley trim on this connector roof.

Roof slopes of 45 degrees (12:12) or more, can accelerate sliding snow with sometimes immense and dangerous consequences. For example, if snow accumulates and then falls onto an exterior gas line, pipes could rupture. From there, the smallest of ignition sources could set the structure ablaze. In addition, the weight of sliding snow can propel any icicles formed on eaves can be propelled down by the force and weight of sliding snow onto people and property below.

On slopes less than 45 degrees (6:12 to 9:12), low amounts of friction (like on smooth roof surfaces) means it offers less resistance to sliding. Striations and embossing on roofing materials like metal panels add a small 3D profile and improve the resistance to sliding, especially when they run traverse to the slope.

This can get complicated, but in general, installing metal panels with snow retention devices on a steeply-sloped roof is recommended. This approach will naturally shed snow and ice, and protect your structure from excessive snow loads. If you have a low-sloped roof, be sure it’s design supports snow as shedding won’t occur naturally. Including enough snow retention devices from ridge to eave is also imperative for this design.

  1. Use Retention Systems

A variety of retention options, such as snow fences, bars or guards, are designed to make snow and ice melt completely or fall from roofs in small amounts. This helps reduce risks associated with sudden rooftop avalanches while maintaining the clean lines of the roof. It is important that snow retention systems are carefully engineered and properly installed. Models like S-5!’s snow-retention device design resource allow you to input your roof dimensions and expected snow load to adequately engineer snow fence assemblies.

  1. Protect Roof Attachments
ABC Roofing and Snow Blog_Pipe Protection
This pipe penetration is protected from sliding ice and snow by a small section of S-5! ColorGuard to the panel seams immediately up-slope from the pipe.

The weight of sliding snow can be powerful enough to take off attachments like exhaust vents. To combat this, reduce the shear load by installing rigid vent pipes securely and as high up on the roof slope as possible. If this is not possible, protect the pipes with a snow retention system.

While metal roofing responds well to harsh winter weather, it is imperative to take the time to keep snow, ice and moisture from causing issues. No matter the roofing design or material used, keeping people and property safe from overhead dangers should be a priority when designing, installing and maintain your structure.

In part two of this roofing and snow series, we’ll review additional considerations. It contains tips on roof layout, color, weathertightness and maintenance, which also play important roles in winter weather protection.

For more information on roofing and snow like how metal panels fare in winter weather conditions and for advice on how to winter-proof your roof, reach out to an ABC representative today.

Metal Roof Pitch Part I: Engineering and Strength Considerations

Whether you’re an owner who needs to consider roofing material options because of the nature or design of your building, or a distributor/contractor whose job it is to recognize whether a suggested design will or won’t work based on a range of circumstances, it is critical to understand the engineering behind why roof pitch and tensile strength are important on a metal building project. In part one of our series, we look at the engineering and strength considerations that need to be taken into account when designing or specifying a building, while part two will review the best type of metal panel to use based on the pitch and end-use of your building,

Engineering Considerations:

Ideally, your roof pitch will be the “sweet spot” between having a roof pitch that’s so shallow that the beared load is increased and having a roof pitch that’s so steep that wind uplift probability is increased—a factor which can also vary based on the building width. Specific engineering considerations with regard to roof slope include:

  • Snow Load Requirements: lower slopes create more load that the roof/structure must support. For example, when you have a flat roof and it snows, the snow will stay on the roof, adding more weight; on a sloped roof, a good amount of the snow will slide off of the roof, so the load will remain in an acceptable range the structure can support.
  • Wind Load: Preventing roof damage from high winds is largely dependent on roof geometry, slope and building material used. If outside air is allowed to penetrate a structure through cracks and other openings when wind flows over a building, the air pressure beneath the roof assembly increases. When this pressure becomes greater than the pressure directly above the roof (which happens as wind flows over a building), this can cause upward force on the roof system, leading to loss of structural integrity and significant damage. Wind uplift rating and minimum slope requirements are dictated by building codes in the market, so be sure to check with your local municipality for specific details.
  • Water Diversion: the steeper the pitch the faster it will channel and divert water, preventing it from pooling and causing other issue like mold, mildew and paint degradation. As with the snow load considerations mentioned above, the less additional weight burdening the roofing system, the better.
  • Minimizing Debris: steeper-sloped roofs also help minimize the chance that debris, mold and mildew have to build up on the roofing system. Unless there is a catastrophic weather event that drops large amounts of heavy debris—tree branches for example—there is a small chance that debris on a roof of any slope will exceed its ability to carry the load. However, because the more debris is able to slide down and off of a metal roof, the less that needs to be manually cleaned. Additionally, access to and cleaning the eaves of sloped roofs is much easier and less time-consuming that trying to perform the same maintenance on a roof with less slope.

The Strength of Metal Panels:

  • Tensile strength: This refers to the panel’s ability to resist breaking when it’s placed under pressure or tension—meaning the panel has a measured ability to bend under a certain amount of stress before it snaps. Galvanized steel panels can withstand between 50,000 and 80,000 pounds of pressure per square inch (50 KSI – 80 KSI)—significantly higher than the tensile strength of other roofing materials. Despite this, metal panels remain lighter and more impact resistant, keeping the likelihood and cost of repairs to a minimum. Check the tensile strength of your metal panels with the manufacturer and be sure to reference common testing standards related to roof slope, including ISO ratings and ASTM standards that test tensile strength.
  • Steel Hardness and Density: While it can generally be assumed that thicker-gauge panels are stronger, the type of building construction, location and end-use can affect the choice in panel thickness. Buildings such as pole barns, post-frame buildings, warehouses and garages can require roof panels to span longer distances and therefore require thicker panels as they are more structurally sound. These thicker panels will also aid in reducing the chance of collapse under the weight of snow and water—particularly when the roof pitch is low. For smaller buildings—like residences—with supporting trusses and purlins that are typically closer together, thinner panels can be used in conjunction with thicker trim for an economic, structurally ideal residential metal roofing system. See our blog on metal panel gauges for more.

Conclusion:

Following common standards, doing adequate research and conforming to manufacturer guidelines regarding slope will ensure you’re reaping the full benefit of your metal roof panel selection. For more information on metal roofs and to learn more about recommendations on roof slope, contact your local ABC representative today.

Additional Resources:

For more information on slope requirements, visit NRCA’s website. For more information on steep-slope metal roofs and their benefits, visit the Metal Construction Association’s website.

Three Reasons To Install A Metal Roof This Winter

Patching up a leak or replacing your roof soon? During the winter months, harsh weather and changing climates can greatly affect a roof’s life span and performance. In addition to low maintenance throughout the year, metal roofing provides even more benefits during the colder months.

Metal Roofing for Cold Climates: Winter Performance

A few of the benefits metal roofing offers in the winter include:

  1. Metal roofing reduces the snow burden.

    Snow and ice can cause major damage to a structure, especially if the weight burden increases during harsh winters. Metal roof panels are manufactured to resist cold weather damage and are installed to gradually shed snow and ice. Snow guards can help ensure snow safely slides off in small amounts, reducing the chance of injury to those below.

  2. Metal roofing cuts the cost of heating bills.

    Metal acts as an insulator and allows both cool and warm air to circulate without escaping–a benefit realized year-round. This results in lower energy costs throughout the year, and helps your home stay cool in the summer and warm in the winter.

  3. Year-round installation means you don’t have to wait until spring.

    The busiest times of the year for contractors is in the spring, when people are preparing for hurricane season, and in fall, when most homeowners want to fix damages before the colder months arrive. Many people assume that metal roofing can’t be installed during winter because of snow and ice, however, this assumption is false. In fact contractors are more likely to be available and to offer lower pricing during this time.

Investing in a metal roof this winter is a decision that will continuously give back financially and environmentally.  With installation available throughout the year and benefits that help you instantly save, why wait? Reach out to your local ABC representative to learn more!